


Day 50 - 53 of #90daysofdevops
Hey Techies! Welcome to this blog
In this blog, we are going to start with Your CI/CD pipeline on AWS.

CI/CD Pipeline using AWS CodeCommit, Codebuild, CodeDeploy and CodePipeline
Welcome to an exciting journey into the world of AWS DevOps! This comprehensive guide will walk you through the steps to set up a robust CI/CD pipeline for deploying a Todo List web app. By leveraging AWS CodeCommit, CodeBuild, CodeDeploy, and CodePipeline, you'll not only learn the basics but also witness the deployment of your own Nginx-powered web application.
This tool helps the user to monitor, store, and provide surveillance to the application source code. you’ll be able to use AWS CodePipeline to orchestrate associate degree end-to-end computer code advancement using these services and third-party tools or integrate every service severally along with your existing tools.
AWS CodeCommit – It is a fully-managed source control service that hosts secure Git-based repositories. CodeCommit makes it easy for teams to collaborate on code in a secure and highly scalable ecosystem.
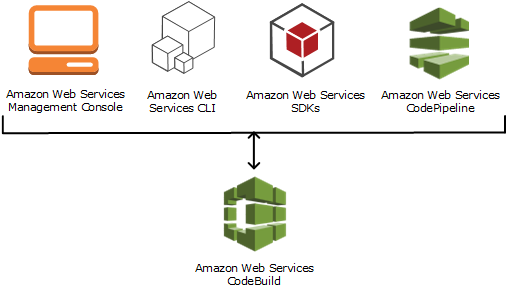
AWS CodeBuild – A fully managed continuous integration service that compiles source code, runs tests and produces software packages that are ready to deploy, on a dynamically created build server.
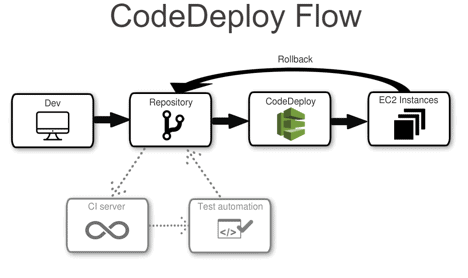
AWS CodeDeploy – A fully managed deployment service that automates software deployments to a variety of computing services such as Amazon EC2, AWS Fargate, AWS Lambda, and your on-premises servers.
AWS CodePipeline – A fully configured continuous delivery service that helps the user to automate their released pipelines for fast and reliable application and infrastructure updates.

Point to note don't use your root user. Create an user before this.
Step 1: Setting Up CodeCommit
Create a CodeCommit Repository:
Begin by navigating to the AWS Management Console and selecting CodeCommit.
Click on "Create Repository" and provide a unique name for your repository.

Create IAM User and Generate Credentials:
Proceed to create an IAM user with administrative permissions.
Generate HTTPS Git credentials for the IAM user.

Clone Repository Locally:
- Clone the repository to your local machine using the HTTPS URL and the credentials generated.

Create Project Files:
- Inside the local repository, create the file: index.html
<!DOCTYPE html>
<html lang="en">
<head>
<meta charset="UTF-8">
<meta name="viewport" content="width=device-width, initial-scale=1.0">
<title>Simple HTML Page</title>
</head>
<body>
<header>
<h1>Welcome to My Website</h1>
</header>
<section>
<h2>About Me</h2>
<p>This is a simple HTML page to demonstrate the basics.</p>
</section>
<section>
<h2>My Interests</h2>
<ul>
<li>Programming</li>
<li>Cooking</li>
<li>Music</li>
<li>Painting</li>
<li>Gardening</li>
</ul>
</section>
<footer>
<p>© 2024 My Website. All rights reserved.</p>
</footer>
</body>
</html>
- Push the changes to the CodeCommit repository.

Step 2: Configuring CodeBuild
Create a Build Project:
Open the AWS CodeBuild console and create a new build project.
Use the provided
buildspec.yamlfile as the build specification.
# buildspec.yaml
version: 0.2

phases:
  install:
    commands:
      - echo Installing Nginx...
      - sudo apt-get update
      - sudo apt-get install nginx -y
  build:
    commands:
      - echo Build started on `date`
      - cp index.html /var/www/html/
     # - cp appspec.yml /var/www/html/
  post_build:
    commands:
      - echo Restarting Nginx...
artifacts:
  files:
    - index.html
   # - scripts/**
   # - appspec.yml
Terms you should know about:
version: 0.2 specifies the version of the Buildspec syntax we're using.
phases contains the build phases for our project.
install: Installs nginx on the build environment using the apt-get package manager.
build: Copies the index.html file to the default web root directory for nginx.
post_build: Performs any additional configuration for nginx, if necessary.
artifacts: Specifies the location of the index.html file to be included in the build artifact.
Save the file and commit the changes to the repository using the git add and git commit commands.
Push Buildspec.yml file to main repo:


Create code Build now:


Edit Artifacts i.e.output can be saved in same.
Configure Artifacts:
Edit the build project to specify an S3 bucket and a folder for storing artifacts.
Create a folder in the S3 bucket named artifact.

Run the Build:
Trigger a build in the CodeBuild console.
Verify that the build is successful, and artifacts are stored in the S3 bucket.


Step 3: Implementing CodeDeploy
Create CodeDeploy Application:
Navigate to the AWS CodeDeploy console and create a new application named
demo-app.Specify the compute platform as
ec2/on-premises.

Create Deployment Group:
- Create a deployment group and associate it with an EC2 instance.


Install CodeDeploy Agent on EC2 Instance:
SSH into the EC2 instance.
Execute the provided shell script to install the CodeDeploy agent.
#!/bin/bash
# This installs the CodeDeploy agent and its prerequisites on Ubuntu 22.04.
# Here you have take care of your region in line no 4 (region must be same).
sudo apt-get update
sudo apt-get install ruby-full ruby-webrick wget -y
cd /tmp
wget https://aws-codedeploy-us-east-1.s3.us-east-1.amazonaws.com/releases/codedeploy-agent_1.3.2-1902_all.deb
mkdir codedeploy-agent_1.3.2-1902_ubuntu22
dpkg-deb -R codedeploy-agent_1.3.2-1902_all.deb codedeploy-agent_1.3.2-1902_ubuntu22
sed 's/Depends:.*/Depends:ruby3.0/' -i ./codedeploy-agent_1.3.2-1902_ubuntu22/DEBIAN/control
dpkg-deb -b codedeploy-agent_1.3.2-1902_ubuntu22/
sudo dpkg -i codedeploy-agent_1.3.2-1902_ubuntu22.deb
systemctl list-units --type=service | grep codedeploy
sudo service codedeploy-agent status

Create appspec.yml and Scripts:
Create an
appspec.ymlfile with the provided content.Create a
scriptsfolder withinstall_nginx.shandstart_nginx.shscripts.Also you have to modify
buildspec.yaml
# buildspec.yaml
version: 0.2

phases:
  install:
    commands:
      - echo Installing Nginx...
      - sudo apt-get update
      - sudo apt-get install nginx -y
  build:
    commands:
      - echo Build started on `date`
      - cp index.html /var/www/html/
      - cp appspec.yml /var/www/html/
  post_build:
    commands:
      - echo Restarting Nginx...
artifacts:
  files:
    - index.html
    - scripts/**
    - appspec.yml
# appspec.yml
version: 0.0
os: linux
files:
  - source: /
    destination: /var/www/html/
hooks:
  AfterInstall:
    - location: scripts/install_nginx.sh
      timeout: 300
      runas: root
  ApplicationStart:
    - location: scripts/start_nginx.sh
      timeout: 300
      runas: root
Nginx Scripts
# scripts/install_nginx.sh
#!/bin/bash
apt-get update
apt-get install nginx -y
# scripts/start_nginx.sh
#!/bin/bash
service nginx start
Build and Deploy:
Trigger another CodeBuild to ensure the latest code artifact is in the S3 bucket.
Create a deployment in CodeDeploy, specifying the S3 location of the artifact.


Configure EC2 Role:
Create a role for the EC2 instance with permissions to access S3 and CodeDeploy.
Attach the role to the EC2 instance.

Restart CodeDeploy Agent:
- On the EC2 instance, restart the CodeDeploy agent.


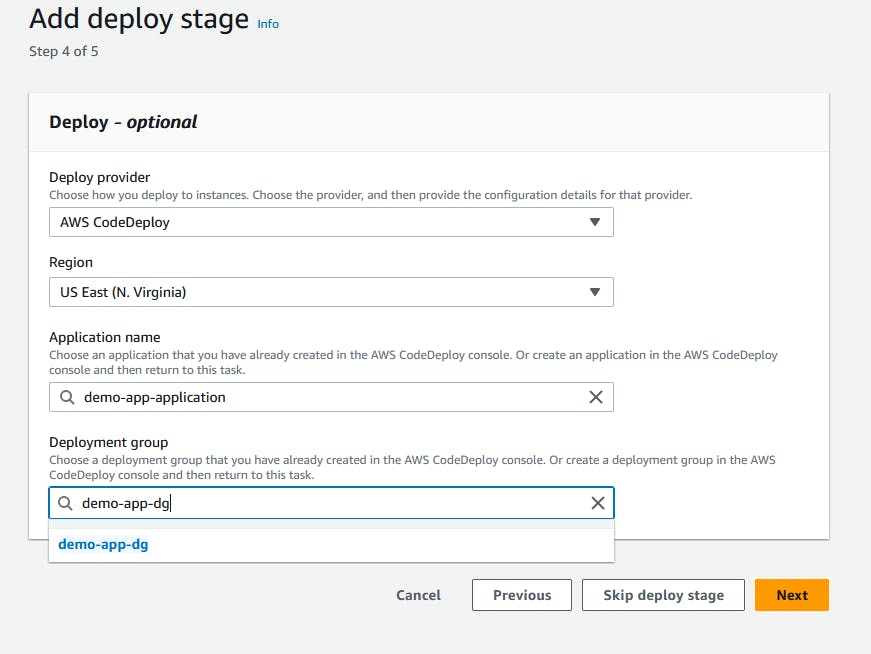
Step 4: Setting Up CodePipeline
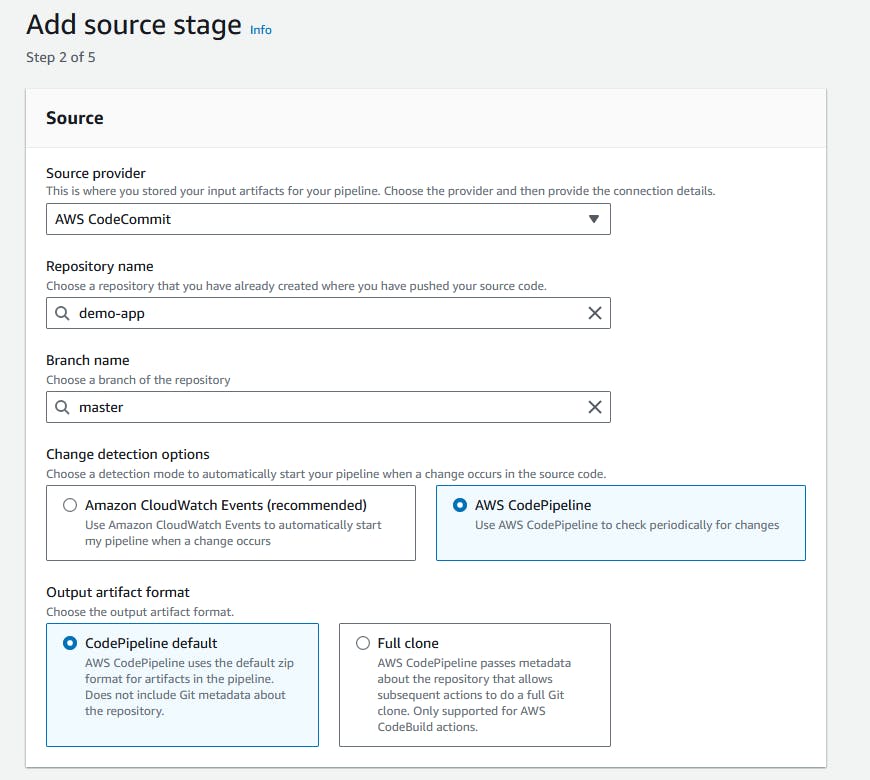
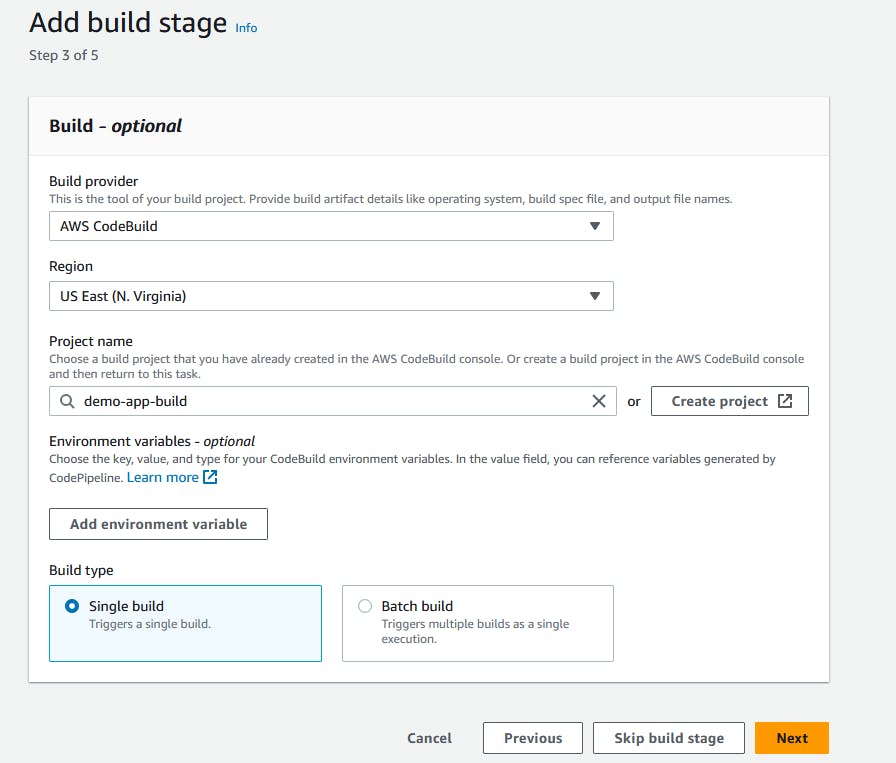
Configure CodePipeline:
Open the AWS CodePipeline console and create a new pipeline.
Add CodeCommit as the source, CodeBuild as the build stage, and CodeDeploy as the deploy stage.
Create Pipeline:
Click "Create Pipeline" to initiate the pipeline.
The pipeline will automatically fetch code from CodeCommit, build using CodeBuild, and deploy using CodeDeploy.


Test the Web App:
Access the public IP of the EC2 instance.
Verify that the app is successfully deployed.

That's it! You've just completed the task. 🎉
Thank you so much for taking the time to read till the end! Hope you found this blog informative and helpful.
Feel free to explore more of my content, and don't hesitate to reach out if need any assistance from me or in case of you have any questions.
Happy Learning!
~kritika :)
Connect with me: LinkedIn